
- 1. Introduction
- 2. Map view
- 3. Track Manager
- 4. Waypoints
- 5. Directions
- 6. Map Manager
- 7. Creating offline maps
- 8. Preferences
- 9. Battery considerations
- 10. Mobile data considerations
You can start creating an offline map by:
- selecting the Create offline button in the map manager
- or while you’re on the map map screen, tap and hold on the map and select Create offline map in the menu
For example, just before an outing, you can use a WiFi connection to download a map of the area you are going to, so you don’t have to use your data connection during the outing.
Source and destination selection

Start by selecting a map source among your available online map sources. If appropriate, the currently viewed map is automatically selected.
MyTrails doesn’t set limitations for free internet map sources (although you should respect the provider’s terms and conditions, as well as rate limitations). Premium map sources, however, usually require a specific offline subscription. Please see the section on topo maps for more info.
You also need to decide where the map will be stored. You can either create a new map or add to an existing map.
Adding to an existing map allows you to:
- continue an interrupted download
- add a separate area to an existing offline map
- add zoom levels from a different provider (for example use Google Map for overview zoom levels [1-11] and satellite for detailed zoom levels [12-16])
You should avoid mixing premium and non-premium maps within the same offline map, because the security used for the premium parts will spread to the non-premium.
Select the zoom levels you wish to download, taking care that detailed zoom levels exponentially increase the download size (each zoom level contains 4 times more tiles, and usually 4 times more data, than the preceding zoom level). Zoom 15 corresponds to a 1:25,000 paper map.
If a previous download was interrupted (explicitly, because your device restarted or because of a low-memory condition), MyTrails will offer to restart it when you enter this functionality.
Tap Next to then select the download area (on tablet devices, both screens are displayed simultaneously).
Area selection within MyTrails

You can select different methods for selecting the area to download:
- Map: long-tap on a corner of the area you wish to download, which will position a pin; by then panning the map, you will be able to select the opposite pin that defines the rectangle to download. You can use the zoom buttons, and tapping one of the pins allows you to easily refine the area definition.
- The first time you use this method, you may feel it’s working backward, but as you get used to it, you will be able to quickly and precisely set the download area. The trick to getting the hang of it is to think of the download area as a rubber band stretched between the 4 pins. When you tap a pin, it is lifted off the map and you can move the map below the hovering pin (so you move the map, not the pin).
- You can move the rectangle by tapping the pin in its center.
- To select a previously-downloaded area, you can tap the pin with a rewind arrow
 in the bottom right of a blue or green rectangle. Green areas represent previous downloads to the same offline map; blue areas (only in premium maps) represen areas downloaded from the same source map (irrespective of the destination, even if the download was performed on another device).
- Track allows you to pick a track; MyTrails will then select the area around the track.
- Waypoint allows you to select a waypoint (global waypoints or waypoints of any track in the Map Manager) and you can then select a radius around that waypoint.
- Radius or Rectangle: enter the coordinates of the center and the pseudo-radius or two corners of the area you want to define.
The number of tiles to download is displayed in the status area. Depending on your connection, each tile takes around a second to download, so make sure you don’t select too many. For premium maps, you need to remain within the maximum area corresponding to your subscription, or purchase additional subscriptions (tap Back to go back to the previous step to check).
Once the settings are ready, you can start the download.
The download process happens in the background, so you can go back to the map or close MyTrails entirely. A notification will allow you to easily come back to the offline map view, so you can pause or cancel the download. You can start using the map offline immediately, although only tiles already downloaded will be displayed.
By default, the download is automatically paused if a WiFi connection is not available. You can change that behavior in the preferences.
Tiles downloaded for offline maps are stored in MGM packs. You can select in the preferences where these MGM packs are stored.
Area selection from a computer
Selecting an area on a small touchscreen may be difficult, so MyTrails 2.0.5 and later offer a second method:
- connect to your account on maps.frogsparks.com
- make sure your terminal is connected to the Google cloud push system (a small Push tag should be displayed on the My subscriptions page; if that’s not the case, try to disconnect, then reconnect MyTrails to the same account – if you use a non-Android device such as a Kindle or Blackberry, use the mail sending system described below)
- start defining an offline map by selecting Configure offline map in the menu
- already-defined areas appear as blue rectangles; they are only for information and cannot be modified
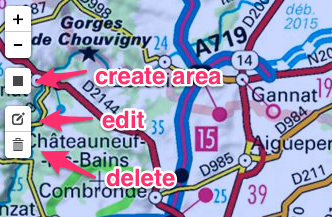
- you can use the area definition tool to create new areas
 or the search tool at the top-right of the map to directly import administrative areas, for example by searching for “texas” (this is not always accurate)
 - you can edit the areas using the edit tool, and delete them with the trashcan tool (in both these cases, don’t forget to confirm the changes by clicking the Save button
- use the Push to my devices link (this is available only when at least one of your Android devices is connected to your account – if not, you can send yourself a link via email that you can then open on the device)
- a notification will be displayed on your device; by tapping them you can set the remaining parameters and start downloading the map