
[post_list preset=”manual”]
When you launch MyTrails, it displays the Map view, and tries to get your current GPS position in order to display a map of your surroundings. It may briefly use network positioning to show your general vicinity until the GPS acquires a lock.

Using the map
On a touchscreen device, you can touch and drag, even fling the map around (kinetic scrolling). On a non-touchscreen device, you can use the D-pad or trackball to scroll the map. You can zoom-in (on the center of the map) or out by tapping the associated icons ![]() and
and ![]() . You can also double-tap the map to zoom-in on a specific location. On non-touchscreen devices, use the D-pad button, and if you have a keyboard, the letter I or the digit 3 to zoom-in, and the letter O or the digit 1 to zoom-out. You can also use the volume buttons of your phone.
. You can also double-tap the map to zoom-in on a specific location. On non-touchscreen devices, use the D-pad button, and if you have a keyboard, the letter I or the digit 3 to zoom-in, and the letter O or the digit 1 to zoom-out. You can also use the volume buttons of your phone.
On Android 2.1 and later devices, the most natural way to zoom in and out is pinch-zooming also known as two-finger zooming.
To switch between the active map providers, you can use a lateral three-finger drag: place three fingers on the screen and move them from the left edge of the screen to the right, or vice-versa. This works best if you have customized your map providers by only keeping a few visible in the Map Manager. This is only available on Android 2.1 and later, and on devices that can handle more than two touch-points.
By touching and holding the map, you can add and edit waypoints or use the contextual menu.
GPS
You can center the map on your current GPS location by tapping the GPS icon ![]() or typing G or 5. This enables the map to keep following your current location until you manually move it. Note that if the GPS is having trouble locating you, the location may be imprecise (red GPS bars).
or typing G or 5. This enables the map to keep following your current location until you manually move it. Note that if the GPS is having trouble locating you, the location may be imprecise (red GPS bars).
When the map follows the GPS location, a blue glow will be displayed around the GPS icon. To help getting back to the GPS icon after exploring your vicinity on the map, MyTrails can optionally center the map again on your current location after 15 seconds. Depending on your preferences, the current GPS location can be denoted by an icon ![]() or a blue circle with a central red dot. This circle indicates the area within which you’re likely to be; the larger it is, the less precise the GPS reading. When the GPS reading is so precise that the blue circle is too small to see, the larger red icon
or a blue circle with a central red dot. This circle indicates the area within which you’re likely to be; the larger it is, the less precise the GPS reading. When the GPS reading is so precise that the blue circle is too small to see, the larger red icon ![]() is used. If your speed is not too low, the GPS is able to determine your direction, and a direction arrow
is used. If your speed is not too low, the GPS is able to determine your direction, and a direction arrow ![]() is displayed instead.
is displayed instead.
When MyTrails is recording a track, a notification icon is displayed in the notification tray: ![]() . If you don’t see that icon (in addition to the Android GPS icon), that means the track is not being recorded.
. If you don’t see that icon (in addition to the Android GPS icon), that means the track is not being recorded.
Compass
You can align the map with the direction you’re currently facing by tapping the compass icon ![]() or typing C or 2 (if the device has a built-in compass).
or typing C or 2 (if the device has a built-in compass).
If you feel the view is too wobbly, you can activate a preference to keep it more stable, at the expense of a slower reaction to changes of orientation. Note that even when the option to follow the compass is not set, the red compass needle will point North (after a few seconds without user interaction, MyTrails may switch the compass off to save battery).
You can also choose in the preferences to align the map to the direction of travel, when you’re moving fast enough for the GPS-detected direction to be accurate.
If you hold the device close to a metal object, the compass will likely behave erratically, just as a physical compass would. The compass is also designed to operate when the phone is held horizontally.
Compass calibration
The compass may need to be calibrated from time to time. Various sources suggest moving the device in a figure 8 a few times. I have found that just flipping the device on each axis (upside-down, end over end, and rotating it keeping the screen upwards) works more predictably.
Scale
![]()
A scale is drawn to indicate distances on the map. It can be switched to Metric or Imperial units in the Appearance preferences. It also indicates the duration since the track recording started, and the approximate distance covered. Note that since GPS readings are not always accurate enough, the recorded track may contain zigzags and the resulting distance may be exaggerated.
A LED is displayed to the left of the distance. It illustrates the current state of track recording. Tap it for more info, and for a color legend. Tap the rest of the scale display for a summary of the current recording.
By default, the scale is unobtrusive. If you’re having difficulty reading it in harsh sunlight, you can make it bolder in the Appearance preferences.
The zoom level can optionally be displayed next to the zoom buttons. This is a number between 1 and 18: the higher the number, the more zoomed-in the map. When MyTrails displays map tiles that belong to the next-higher zoom level, the zoom is indicated with x2 (or x4), by analogy with digital zooming on cameras.
You can force MyTrails to use this digital zooming (to make it easier to read details on a map without loading the tiles for the next zoom level) by long-tapping the zoom button.
The coordinates of the map center may optionally be displayed above the scale.
HUD and permanent scale (Pro only)
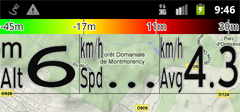
To quickly glance at your current altitude, current or average speed, you can bring up the Head-Up Display, by performing three-finger swipe from the top of the screen to the bottom. You can hide the HUD again by the opposite gesture, or leave the HUD visible permanently. If your device can not handle a three-finger gesture, you can show and hide the HUD in the preferences. If the GPS doesn’t have a good enough fix, the current speed and altitude may not be available. The average speed is always available, and is based on the total distance and time, indicated in the scale. You can also choose to enable the permanent scale, which shows a color-coded reference of the colors used for the track.
Menu
")
On Honeycomb and later, the menu is complemented by the action bar:
![]()
Hitting the menu key brings up the following choices:
- Recording [on/off]: the current recording submenu, see below.
- Tracks: the Track management submenu, see below.
- Select Map: switch to another map among the currently configured maps. More maps can be configured in the Map Manager.
- Look for
-
- address or location: enter a location (city, park, mountain, even a complete address. A waypoint will automatically be created for you.
- contact: select a contact to move the map view to it, provided the geocoding service understands your request. If multiple results are available, a list will be presented to you. Because the search is performed online, an internet connection is required. A waypoint will automatically be created for you.
- directions: get directions between two locations. Because the directions are retrieved from an online service, an internet connection is required. Directions can be cached offline, however.
- coordinates: jump to a set of coordinates, which can be specified in a variety of formats, including US and UK grid references. You can select to create a waypoint at these coordinates.
-
- Preferences: the preferences settings.
- Quit: this menu is provided for users who like to make sure the application exits. It can be removed in the Behavior preferences.
Recording menu
- Save: save the recorded GPS track as a GPX file. The file will be placed on your external storage – usually the SD Card – in a folder called MyTrails, and added to the Track Manager.
- Pause/Resume: pause or resume the recording.
- Save then clear: optionally saves the track, then create a blank one.
- Clear: starts a blank track.
- See whole: zooms the map to show the entire recorded track.
- Manage tracks: the Track Manager, see below.
- Zoom to all tracks: zooms the map to show all currenly active tracks.
- Select colorization: pick the type of colorization (shortcut to the same item in the Appearance preferences).
- Colorization legend: displays the legend for the current track colorization.
- Pending operations: allows you to control operations that have been deferred.
Contextual menu
- Create offline map: define an area to download offline.
- Send as SMS: send the tapped location as an SMS. If the recipient has installed MyTrails SMS, instead of receiving an SMS in their Messaging application, MyTrails will import the location as a waypoint.
- Send current loc. as SMS: send the current GPS coordinates as an SMS.
- Open in another map app: displays a menu to select another map application (including Google Maps) that can display the current location. You can use this to start a Navigation.
Back key / Quitting MyTrails
If a track is being recorded, hitting the back key brings up a dialog asking you whether you would like to keep running the GPS tracker in the background or stop it. Once you stop it, no track is recorded and no further battery is consumed. If no track is being recorded, the back key behaves as normally for Android applications: it exits immediately.
You can hold the back key or double-tap it to bypass the dialog.
While using the back key is the preferred way to quit MyTrails (and most other Android applications), some new users may be disoriented by the lack of an explicit Quit menu, so MyTrails offers such a menu by default. This can be removed in the Behavior preferences.
Keys
On devices equipped with a physical keyboard or keypad, you can use the following keys:
- D-pad: scroll the map
- D-pad button: zoom-in
- 0: display next map in the list
- 1 and the letter O: zoom-out
- 2 and the letter C: toggle follow compass
- 3 and the letter I: zoom-in
- 4: tilt the map left
- 5 and the letter G: toggle follow GPS
- 6: tilt the map right
- 8: for local maps and AQM packs, center the view on the default location for the map (useful if you get lost off-map)