Tag Archives: manual

Pending operations

Because some operations like altitude normalization or sending a new recording to a track sharing community or to Dropbox require a data connection, MyTrails allows you to defer these operations until you are in range of a Wifi network or a cellular connection.

A notification will appear to let you run pending operations, or you can run MyTrails and use the Tracks > Pending operations menu.

Mobile data considerations

MyTrails can operate both on-line and off-line. Like most connected applications, it will take advantage of your data connection when one is present, and provide the best possible service when not.

If you are travelling abroad, please use caution when using any application on your device, and in particular MyTrails, since map data can be especially hefty.

The safest policy when travelling abroad is to turn off mobile data entirely on your device, in Android’s settings. This will avoid any source of bill-shock from applications using data in the foreground or the background. Some of MyTrails’ features will no longer work (you will not be able to view maps that are not cached or downloaded to offline maps, you will not be able to normalize tracks and post or download them to track-sharing communities, get directions, etc.), but MyTrails deals with this gracefully (including the ability to defer track activities).

If you do keep your mobile data on, please be aware that even if you’re using MyTrails with an offline map, a small amount of data usage may occur: checking for updates, license verification, helping the GPS get a faster fix, the occasional geocoding request, as well as the more obvious cases above. Also be mindful that if you have configured your offline map to have a fallback, tiles that are missing from the offline map will be downloaded over your mobile connection.

MGM Howto

MyTrails 1.1 and later can create offline maps directly on your device, so using an external tool is not required. Of course, the following desktop-based tools offer more flexibility.

Which tool should I use?

If you want to download existing map tiles from the web so you have a local tile cache on your phone, the best tool is MOBAC.

If you have a scan of a paper map, or some other type of picture of a map, then you should use Mapc2Mapc or MapCruncher.

Using MOBAC to create an MGM cache of web maps

There is an issue with the older implementation of MGM in MOBAC which causes some MGM folders to be empty. Please make sure you use an up-to-date version (1.9 final or later).

MOBAC is an open-source Java tool that makes it very easy to generate MGM packs from a large choice of online map providers. It runs on all major desktop operating systems and is actively maintained for new providers and new map formats. Unfortunately, its author has been forced to remove map definitions for all non-free map providers; if you look around a bit, you should be able to find map definitions in the form of XML documents that MOBAC can use.

MOBAC does not run on your Android device, you must have a computer in order to use it and transfer the maps to your device using your USB cable.

Installation

MOBAC comes as a zip file, which you should extract to your hard-drive.

Running MOBAC

On Windows, you should double-click the Mobile Atlas Creator.exe icon. On Unix-like platforms (including MacOS X), you can run start.sh from a command-line. Or you can double-click the Mobile Atlas Creator.jar file and usually ignore the resulting error message.

Creating the MGM pack

  1. Pick the map you’re interested in from the list of available maps. There is a very large variety of map sources and more are added regularly by the MOBAC team.
  2. Select the zoom levels you’re interested in. Be careful that selecting “deep” (high number) zoom levels dramatically increases the download volume, and the size of the MGM pack you will have to transfer to your device.
    Mobac calculates the number of tiles based on the selected area and zoom level; each tile adds about 25kB, so 40,000 tiles is approximately 1GB.
    Please keep the zoom levels contiguous, or MyTrails may display the map incorrectly or blur the available tiles.
  3. Select the area on the map you wish MOBAC to download.
  4. Pick a name for the layer and click Add selection.
    You can do this several times, and change the map source each time. This will create several MGM packs that you can store in the same directory on your device.
  5. Select the MyTrails format (MGMaps/MyTrails (MGM)).
  6. Click Create atlas. MOBAC will download the relevant tiles and generate the MGM pack. This may take a long time.

Using Mapc2Mapc to georeference a scanned map

  • Download Mapc2Mapc, a shareware Windows application that allows you to align a scanned, stitched or photographed map to existing maps coordinates (a process called georeferencing).
  • Mapc2Mapc is able to directly output MGM packs, so no other software is required. Extensive documentation is available, including step-by-step how-tos.

How to use:

  1. download the script to Win XP (other versions of Windows may also work)
  2. install and buy mapc2mapc (http://www.the-thorns.org.uk/mapping/down.html) version >= 485
  3. edit the script to define the variables (lines starting with SET)
  4. drag and drop map files (for example .map) on the mapc2mytrails.bat icon (10 maps maximum)
    or drag and drop a folder containing the map files

New maps can be added to a folder that already contains MGM files, the maps will then be merged.

Using MapCruncher to georeference a scanned map

  • MapCruncher is a free Microsoft tool (Windows-only) that allows you to align a scanned, stitched or photographed map to existing maps coordinates (a process called georeferencing).
    MapCruncher is no longer being maintained, and is no longer available on Microsoft’s web site. I am hosting a backup on Dropbox.
  • MapAlive should be used to generate an MGM pack from the tiles generated by MapCruncher; 64 tiles per file is the recommended setting for 1,000 to 1,000,000 tiles.

Preferences

The preferences in MyTrails change fairly frequently as new features and customizations are introduced; this manual may not be fully up to date…

Appearance

  • Larger icons: increases the size of on-map icons (current location, waypoints and tracks), and the scale display, for better visibility outdoors or on moving “vehicles”.
  • Larger buttons: increases the size of buttons and spreads them apart more to make them easier to hit.
  • Larger map: allows you to change the density of how the map is drawn. Recent screens use a very high pixel density which may make it hard to see map details when MyTrails draws map tiles at 1 map pixel for one screen pixel resolution. You can let MyTrails automatically adapt to the resolution or force it to draw the map bigger to compensate (it will be less sharp).
  • Draw accuracy circle: if enabled, the current GPS location will be denoted by a blue circle, the radius of which indicates the accuracy radius of the current GPS reading. The smaller, the more accurate. If disabled, a red GPS dot will be displayed instead.
  • Allow overzoom: allows MyTrails to zoom in beyond the maximum available zoom level for the map you’re currently viewing. This makes the map slightly blurry, but it can help readability when bright sunlight is making the map hard to read.
  • Full screen mode: if enabled, the notification bar (with signal, battery strength, etc.) will be hidden to leave more room to the map. On Android 3 and later, a button will be displayed at the top-right when full-screen is active to bring up the Action Bar.
  • Show HUD: display the Head Up Display on top of the map (Pro only)
  • Always show legend: display the legend above the map (Pro only). You can also use the Tracks > Colorization legend menu to display the legend on-demand.
  • Display zoom level: draws the current zoom level next to the zoom buttons.
  • Display coordinates: allows you to select a coordinate system (global like DMS [degree-minute-second] or local like GB National Grid) to optionally display the coordinates for the center of the screen (a reticle will be drawn at the center).
  • Track colorization: the track can be colorized to represent various variables (the description of the colors is rough, please use the Track > Colorization legend for a graphical representation):
    • Solid: just the track shape, a bright yellow line.
    • Altitude: the track is colorized according to the altitude (green for low points on your track, orange and red for intermediate and black for the high points).
    • Rate of ascent: increasingly bright red for faster ascents, blue for descent.
    • Speed: grey for stationary or very low speed, green for moderate speed, brightening to reds for higher-speed parts of your track.
    • GPS accuracy: red for low accuracy, orange for intermediate, green for high accuracy.
    • Slope: increasingly bright red for steeper ascents, blue for descent. The difference between rate of ascent and slope is that rate of ascent reflects how quickly you went up or down, whereas the slope merely reflects how steep the trail was.
  • Track color: the color used for the current track recording. If the colorization is not set to Solid, this color is used as an outline.
  • Thick track highlight: check if you prefer the track to be more visible.
  • Use Metric units: uncheck to use Imperial units instead of the default Metric units.
  • Display zoom level: check to indicate the zoom level next to the map scale.
  • Display track duration: uncheck if you don’t need the track duration next to the map scale.
  • Larger scale display: check to have the scale displayed larger, so it’s more readable in harsh sunlight.

Behavior

  • Long compass filter: enable this to prevent wobble in the compass, which can make the map hard to read on some devices. The side-effect will be that the compass will have more inertia, so it will not respond as quickly when you reorient the device.
  • Filter GPS readings: this will filter out anomalous GPS readings, for example if the connection to the GPS is lost and cell location is employed instead. This may cause a longer delay when acquiring the signal initially and may drop readings, for example if you try recording a track while moving very quickly (on a plane, for example).
  • Sticky GPS: if this option is checked, the map will automatically center on the GPS after you’ve dragged it around, if the follow GPS icon was highlighted before you started dragging the map.
  • Disk cache: determine how much of your external storage can be used to cache downloaded map tiles. In any event, MyTrails will always leave 1MB free.
  • Saved tracks location: select where tracks are saved by MyTrails
  • New offline maps location: select where offline maps are saved
  • Wifi-only offline map creation: uncheck this if you don’t mind your phone continuing to download offline maps using your data connection rather than WiFi.
  • Proximity notification: select the type of notification used when you’re approaching a waypoint (Pro only).
  • Hide Quit menu: this will remove the Quit menu, which is enabled by default for new users.

Creating offline maps

You can start creating an offline map by:

  • selecting the Create offline button in the map manager
  • or while you’re on the map map screen, tap and hold on the map and select Create offline map in the menu

For example, just before an outing, you can use a WiFi connection to download a map of the area you are going to, so you don’t have to use your data connection during the outing.

Source and destination selection

Start by selecting a map source among your available online map sources. If appropriate, the currently viewed map is automatically selected.

MyTrails doesn’t set limitations for free internet map sources (although you should respect the provider’s terms and conditions, as well as rate limitations). Premium map sources, however, usually require a specific offline subscription. Please see the section on topo maps for more info.

You also need to decide where the map will be stored. You can either create a new map or add to an existing map.

Adding to an existing map allows you to:

  • continue an interrupted download
  • add a separate area to an existing offline map
  • add zoom levels from a different provider (for example use Google Map for overview zoom levels [1-11] and satellite for detailed zoom levels [12-16])

You should avoid mixing premium and non-premium maps within the same offline map, because the security used for the premium parts will spread to the non-premium.

Select the zoom levels you wish to download, taking care that detailed zoom levels exponentially increase the download size (each zoom level contains 4 times more tiles, and usually 4 times more data, than the preceding zoom level). Zoom 15 corresponds to a 1:25,000 paper map.

If a previous download was interrupted (explicitly, because your device restarted or because of a low-memory condition), MyTrails will offer to restart it when you enter this functionality.

Tap Next to then select the download area (on tablet devices, both screens are displayed simultaneously).

Area selection within MyTrails

You can select different methods for selecting the area to download:

  • Map: long-tap on a corner of the area you wish to download, which will position a pin; by then panning the map, you will be able to select the opposite pin that defines the rectangle to download. You can use the zoom buttons, and tapping one of the pins allows you to easily refine the area definition.
    • The first time you use this method, you may feel it’s working backward, but as you get used to it, you will be able to quickly and precisely set the download area. The trick to getting the hang of it is to think of the download area as a rubber band stretched between the 4 pins. When you tap a pin, it is lifted off the map and you can move the map below the hovering pin (so you move the map, not the pin).
    • You can move the rectangle by tapping the pin in its center.
    • To select a previously-downloaded area, you can tap the pin with a rewind arrow in the bottom right of a blue or green rectangle. Green areas represent previous downloads to the same offline map; blue areas (only in premium maps) represen areas downloaded from the same source map (irrespective of the destination, even if the download was performed on another device).
  • Track allows you to pick a track; MyTrails will then select the area around the track.
  • Waypoint allows you to select a waypoint (global waypoints or waypoints of any track in the Map Manager) and you can then select a radius around that waypoint.
  • Radius or Rectangle: enter the coordinates of the center and the pseudo-radius or two corners of the area you want to define.
In all cases, you can jump to another tab to update the area you defined.

The number of tiles to download is displayed in the status area. Depending on your connection, each tile takes around a second to download, so make sure you don’t select too many. For premium maps, you need to remain within the maximum area corresponding to your subscription, or purchase additional subscriptions (tap Back to go back to the previous step to check).

Once the settings are ready, you can start the download.

The download process happens in the background, so you can go back to the map or close MyTrails entirely. A notification will allow you to easily come back to the offline map view, so you can pause or cancel the download. You can start using the map offline immediately, although only tiles already downloaded will be displayed.

By default, the download is automatically paused if a WiFi connection is not available. You can change that behavior in the preferences.

Tiles downloaded for offline maps are stored in MGM packs. You can select in the preferences where these MGM packs are stored.

Area selection from a computer

Selecting an area on a small touchscreen may be difficult, so MyTrails 2.0.5 and later offer a second method:

  • connect to your account on maps.frogsparks.com
  • make sure your terminal is connected to the Google cloud push system (a small Push tag should be displayed on the My subscriptions page; if that’s not the case, try to disconnect, then reconnect MyTrails to the same account – if you use a non-Android device such as a Kindle or Blackberry, use the mail sending system described below)
  • start defining an offline map by selecting Configure offline map in the menu
  • already-defined areas appear as blue rectangles; they are only for information and cannot be modified
  • you can use the area definition tool to create new areas
    Define offline map
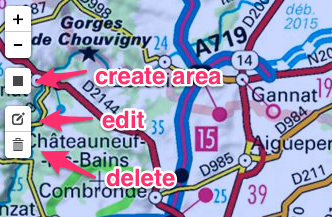
or the search tool at the top-right of the map to directly import administrative areas, for example by searching for “texas” (this is not always accurate)
  • you can edit the areas using the edit tool, and delete them with the trashcan tool (in both these cases, don’t forget to confirm the changes by clicking the Save button
  • use the Push to my devices link (this is available only when at least one of your Android devices is connected to your account – if not, you can send yourself a link via email that you can then open on the device)
  • a notification will be displayed on your device; by tapping them you can set the remaining parameters and start downloading the map

Map Manager

The Map Manager allows you to customize the list of maps that MyTrails will display.

MyTrails supports many online map providers, both global and local, and the MGM offline map format. It can generate an offline map from any of the online providers (with some limitations for premium map providers).

 In the Map Manager, you can edit, add or delete map definitions. Maps marked with a ★ are premium maps: they require a subscription to use (although most have a free trial period). Select Premium maps in the menu for a list of all premium maps (some do not appear in the map list by default to keep it shorter).

By toggling the Show/Hide button to the right of each map, you can select which maps are available in the Select Map menu of the main map view, and rotated through by lateral three-finger swiping.

Tap a map to edit its definition (see some of the available map types below for more information).

From the menu key, you can also reset the definitions, which will update and undo any changes you have made to the default map definitions (the definitions you created will not be changed), delete the default definitions (without recreating them) or delete all definitions (one will remain, however).

In order to quickly simplify the map menu, you can select Hide other countries’ maps in the menu: this will hide all maps that are for countries other than the one your phone is configured for. Global providers will remain enabled.

 You can long-press on a map for a contextual menu:

  • Edit map: bring up the map edition screen, where you can rename the map and change its paramaters. See the next sections for details of editing maps.
  • Reorder to map…: to move the map within the list, select a map in the list that is presented; the original map will be moved in the list to be just before the map you selected.
  • Delete map: delete the map; if the map is an offline map, you will be asked to confirm whether you would like to delete the map definition only, or also the offline map tiles.
  • Delete cache for map: deletes the downloaded map tiles for this map; you can use this when the map provider has updated the look of their maps to force MyTrails to re-download.
  • Hide all but this map: mark all maps as Hide, except the one you selected (you can not hide all tracks).
  • Show all maps: marks all the maps as Show.

Tap the Add button to create a new map. This can be an offline map you have downloaded on a computer, an OpenStreetMap (or other) map that you define from its URL, a WMS provider, or a variation on one of the built-in map types.

Offline map (MGM)

MGM Packs uses the MGM format popularized by Mobile GMaps. Packs can be stored on the device’s SD card by synchronizing with your computer. The format allows efficient storage of huge number of tiles, at multiple zoom levels. Tools exist to generate these files. Please see the MGM Howto for more info.

Once you have synchronized an MGM pack to your device, you can set the path to it in the MGM configuration either by typing it in, or by clicking Select... (if you synchronized the pack by connecting your device to your computer via USB and mounting the external storage as a USB drive on the computer, the MGM packs will be somewhere under /sdcard). If multiple packs are located within the same directory, you will then have to pick the specific pack the map should use.

MGM Packs can be configured with a fallback. Tiles that are not found in the pack will be loaded from the fallback amp. The fallback will usually be an online map (covering the entire world), but it can be a local map as well. If the fallback itself has a fallback, that will not be used (tiles missing from the fallback also will be drawn as missing).

The MGM format is used by MyTrails when it downloads a map offline. Please see the relevant section for more info.

Flexible URL maps

The flexible URL map editor allows you to use maps that MyTrails hasn’t yet discovered, or update the map definition to use different defaults or fix the URL that MyTrails uses in case the map provider has changed their URL format.

It is used mostly for OpenStreetMap-based maps, and for other map providers that use a similar URL pattern.

You can tap on one of the sample providers to populate the URL and Referer [sic], and you can then tweak the URL to use different options and styles if such are offered by the map provider.

Some map providers such as WanderReitKarte offer premium tile services and require a URL that includes a user-specific key. You can insert it in the URL.

WMS maps

Web Map Service is a standard protocol used to discover, configure and access web map providers.

You can enter the base URL to a WMS map provider. MyTrails will then allow you to pick the parameters for the map, or you can type them in yourself.

Testing

For flexible URL and WMS maps, you can quickly check that the map definition is correct by using the menu button, then Test map, which will bring up a simple window where you can zoom in and out and pan.

Battery considerations

Any application that uses the GPS continuously will run the battery down at an accelerated rate. MyTrails takes many precautions to minimize battery usage: the compass is put to sleep when you turn the screen off, and GPS readings are taken as rarely as possible, while still recording an accurate track. The screen is redrawn only when necessary.

You can turn the screen off to conserve the battery: MyTrails will keep recording. You can even close the application (leaving the tracker running). You will notice that while MyTrails is recording your track it adds a notification to the Android notification bar. You can tap on it to get back to MyTrails.

If you’re taking a break, you can stop the tracker to minimize battery drain. Just don’t forget to start it again once you get going.

You can also use the Optimize battery preference to turn off the most battery-draining features of MyTrails.

You should also turn mobile data off if you intend to use MyTrails for more than 6h on a standard phone: even when not in use and especially in remote areas, cellular data uses a lot of power.

Don’t worry about data loss if your battery runs out while you’re recording a track: MyTrails saves the track frequently and will load it in when you turn the device back on.

For multi-day trips without the ability to recharge your phone, you should consider spare batteries (if your phone doesn’t use a sealed battery) or an external battery pack, which will allow you to recharge through the MicroUSB port.

There are many different models of external battery packs, of varying capacities.

Directions

MyTrails can retrieve directions from point A to point B and display them as a new track. The start and end points can be manually defined by their coordinates, or they can be those of waypoints or the current GPS location. Directions can be optimized for walking, driving and in certain countries for bicycling.

Once the directions are received from the online service, a new track corresponding to the itinerary is created, and for each manoever a waypoint may optionally be created, which includes the text description of the manoever. These tracks are saved as GPX, and can be manipulated like any other tracks (shown, hidden, forgotted, reloaded), so with a little forethought you can use directions while completely offline.

If the map you are using is not Google, you may notice that the directions track is not exactly aligned with the map. This is because different map providers have slight differences that can be seen at high zoom levels.

MyTrails is not a Voice Navigation application: it simply offers a basic way to see the path you may want to take to travel from one location to another. It does not have the vector map data that would allow it to correct errors in the GPS location (snapping), it does not offer re-routing, it does not dynamically display navigation instructions, and it doesn’t really try to be very smart about directions.

Proximity notifications

Despite the warning in the previous section, MyTrails borrows one feature from Voice Navigation apps: proximity notifications.

When you’re getting close to a waypoint, MyTrails will warn you with a selectable combination of vibration, ring and spoken information. This is not restricted to waypoints associated with directions, but works for all waypoints, so you can plan a few turns ahead on a trail that only you know about, and you will get the warning.

The distance at which the notification is triggered adapts to your current speed: for highway speeds, it’s about 1km (or mile); for slower roads, 500m; for city driving or biking speeds, 200m; for walking speed, 50m.

Getting back to the previous warning: MyTrails doesn’t try to be smart with notifications, and it doesn’t care about the sequence of manoevers in a direction track, so despite our best efforts, the wrong notification could be given; make sure you always double-check, and don’t drive into a ditch or jump off a cliff.

Waypoints

By touching and holding the map, you can add a waypoint, either where you pressed, or at the current GPS location.

Waypoint names and descriptions can be edited; they can be associated with a saved track (GPX), the current recording, or be global (always shown); and they can either use the same color as the track, or override the track color.

Tapping existing waypoints allows you to use the waypoint (tap the tip of the waypoint rather than the body). If several waypoints are in the close vicinity of your tap, a list of nearby waypoints will be displayed first, so you can select the one you intended to interact with.

Context menu

  • Edit: change the waypoint data (name, description, track and color).
  • Delete: remove the waypoint.
  • Reposition: this allows you to move the waypoint; other waypoints are grayed out, and you can scroll the map until the waypoint is in the desired location, then tap to confirm, or use the back key to cancel. They way this works may be counter-intuitive the first time you use it, but once you get used to it, it’s much easier than the traditional pick-up-and-drag: your finger doesn’t obscure the waypoint or the map, and you don’t need to worry about what’s going to happen if you need to move the waypoint to a point that’s further than the edge of the screen.
  • Change coordinates: enter the precise coordinates you wish to reset the waypoint to.
  • Center: center the map on the waypoint.
  • Set as target: draws a line from the current GPS location to the target waypoint to help navigating to it.
  • Directions to/from: open the Get Directions dialog.
  • Copy to track: create a copy of the waypoint, on another track.
  • Create offline map: start to download the map offline around the waypoint.
  • Send as SMS: send the waypoint as an SMS. If the recipient has installed MyTrails SMS, instead of receiving an SMS in their Messaging application, MyTrails will import the waypoint.
  • Open in another map app: displays a menu to select another map application (including Google Maps) that can display area around the waypoint. You can use this to start a Navigation.

Waypoints associated with the current recording are saved to the GPX file when the recording is saved. Waypoints that you add to imported GPX or edit after the GPX has been loaded are not saved back to the GPX, and will be lost if the GPX is reloaded (you can re-save the GPX in the Track Manager).

Track Manager

The Track Manager allows you to load GPX tracks, whether saved by MyTrails or any other GPS logger that can export GPX files.

Use the Load button or Load all GPX in a directory menu to import one, several or a whole directory of GPX tracks. This operation takes a few moments, but it is performed in the background. As they are loaded, the tracks appear in the list.

For each track, you can select whether it should be shown on the map or not, whether it should be colorized according to the current colorization scheme or drawn as a solid line, and the color of the track (used as an outline if the track is colorized). Tap a track to get more information about it.

From this screen you can also start or stop recording your current track.

Track sharing

Finding tracks

Use the Download button to retrieve tracks in your neighborhood from several online communities or your own cloud storage service.

Each community or cloud storage service has a slightly different user interface and set of filters. The filters will help narrow the type of track you’re looking for, depending on the activity.

For track sharing communities, you should first select the location around which MyTrails will look for tracks. Initially, MyTrails will use a small search radius around that location, which you can extend by tapping the Widen search button. Select tracks and tap Download to start the download, which will happen in the background.

If you have logged in to the community, your private tracks will be found as well. If not, only public tracks are found.

Sharing your tracks

Long tap a track in the main track list, then select Upload track to send the track to one of the track sharing communities or your own cloud storage.

Each track sharing community supports different meta-data; please take care when setting this data so that other users can more easily find it.

You can choose to send a tweet after upload if elected to make it public when uploading it.

Menu

 Use the menu key for actions affecting multiple tracks:

  • Load one ore more GPX: brings up a file selection screen where you can pick GPX tracks to load. You can select more than one.
  • Load all GPX in a directory: brings up a directory selection screen so you can import all GPX within that directory.
  • Show tracks in current map: all the tracks that are close to the current map view are marked as Show. If you only want to show those tracks, use Hide all tracks first.
  • Hide all tracks: mark all tracks as Hidden.
  • Zoom to all tracks: goes back to the map view and centers the map so that all tracks currently marked as Show are visible on the map.
  • Forget all tracks: unloads all currently loaded tracks. The source GPX tracks are preserved.

Contextual menu

Tap on a track for more information about the track, or tap and hold for a contextual menu:

  • Track details: more information about the track.
  • Edit track: edit the track name and description. You can check Update the GPX file to re-save the GPX afterwards: this data is stored in the GPX file.
  • Upload track: send the track to one of the track sharing communities or your own cloud storage.
  • Save track: save the GPX again, possibly into a different location.
  • Share: use to send the GPX via email or another application installed on your device.
  • Forget track: removes the track from MyTrails, but does not delete the GPX for your device (for safety reasons).
  • Zoom to track: show the track on the map (only available if the track is not hidden)
  • Zoom to all tracks: goes back to the map view and centers the map so that all tracks currently marked as Show are visible on the map.
  • Hide all tracks: mark all tracks as Hidden.
  • Normalize altitudes (online): uses an online database of altitudes to snap the track to the known terrain altitude. This is generally more accurate than the GPS-calculated altitude, but is not useful when the track wasn’t recorded on the ground.
  • Create offline map: Starts the creation of an offline map around the track

Twitter integration

 After uploading the track to some track sharing communities, you can choose to create a tweet about it. This invokes a twitter client on your device, and in most cases Android will ask you to pick one (or a web browser).

Some Twitter clients correctly handle this (the official Twitter client and Twicca) and using a web browser always works (you will be asked to log in if you aren’t already), but several popular Twitter clients do not correctly recognize the Twitter API for this.

Pending Manager

Please see the separate section.